Planting
Overview
Plants represented with individual blocks. Raindrop manages the symbols and organization for you. There are also tools for labeling plants, generating plant quantities and schedules, and swapping plants.
Adding New Plants
Click the Add Plant button on the plants tab, or go to the planting tab in the settings dialog. Here you can add plants to your project, modify plant properties, and add new plants to the database.
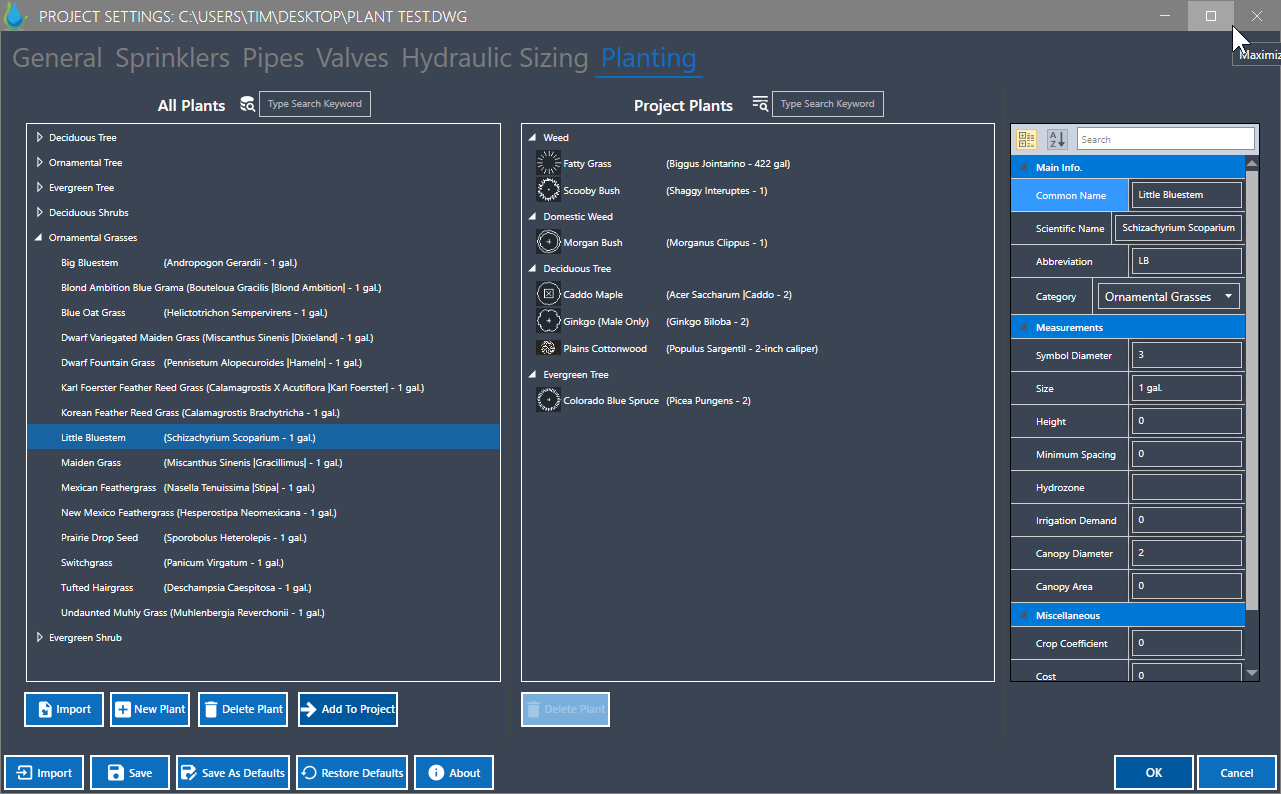 The left pane is all the plants in the database. As you add plants, they will be saved here for future projects. Selecting a plant in the left pane and clicking Add To Project will prompt you for a symbol, then copy the plant to the middle pane which contains all the plants in your current drawing. The right most pane contains editable properties can be included for informational purposes.
Plants Palette
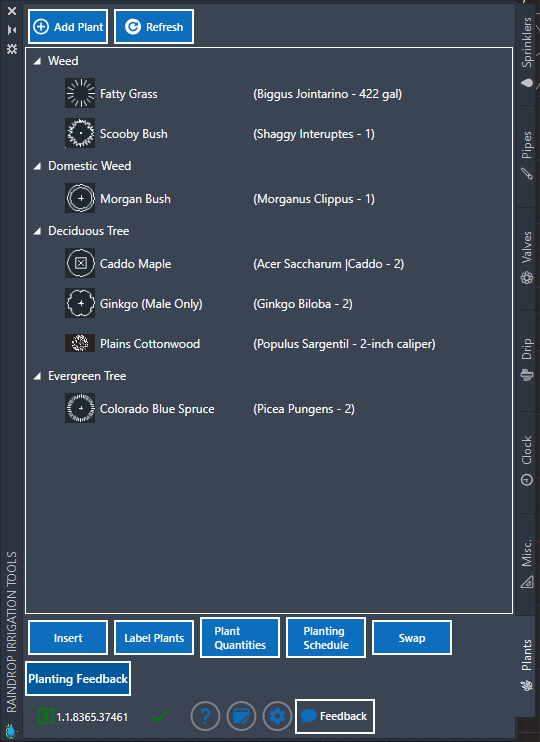
The plants palette can be found on the main tool palette. It shows the current plants in the drawing and provides for plant related commands.
Categories
Note that plants are broken down into categories. This helps keep them organized. Each category will be on it's own layer. And the categories can be collapsed in the planting tool, allowing you to focus on inserting a few types of plants as your design progresses.
Inserting plants into your drawing
Plants can be inserted either by selecting a plant or simply clicking on the plant symbol. Plants will be placed in the drawing where you click. You can also copy plants using the copy command.
Labeling Plants
The Label Plants button will allow you to label selected plants with an MLeader. Style of the leader can be edited via the AID_PlantLabel Multileader style. If the extension line on the labels is distracting freeze the prefix-LabelExtension layer.
Plant Quantities.
The plant quantities button can be used to export a quantity table for the selected plants to either Excel or text files.
Plant Schedule
The plant schedule button will prompt for a group of plants, and place a table or legend into the drawing for the selected plants.
Open Settings > App > Planting schedule before placing a new schedule:
- Symbol sizing — Uniform (default): fit symbols proportionally into a common square display area and give all plant rows the same height. Long or multiline text can increase that common height.
- Symbol sizing — Drawing size: preserve inserted symbol sizes. Larger symbols produce taller rows; small symbols still leave enough room for text.
- Uniform symbol size: width and height of the display area, measured in multiples of schedule text height (default 4). Used only in Uniform mode.
- Vertical padding: minimum space above and below content, measured in text heights (default 0.5). Applies in both modes.
- Columns: choose Symbol, Code, Quantity, Botanic/common names, Size, Height, Diameter, and Note. Select at least one column.
- All caps: uppercase schedule text without changing plant data.
Changes save automatically as app defaults across drawings. Set separate Body text size and Header text size in plotted inches or millimeters, and select a Text style from the current drawing. The default matches the imported plant-label text style, RD_PipeSize. The chooser shows the actual default style name; if a saved style is missing in another drawing, it shows the fallback used there. These preferences apply to new schedules and do not reformat existing schedules or resize plants and shared symbols. Abbreviation updates retain each new schedule's All caps choice. Symbols retain their plant layers and display properties; plants on different layers appear in separate rows.
Swap
This button will swap plants selected in the drawing with the selected plant on the tool palette.
Symbols/Blocks
Plant symbols are stored in the install directory in a file called PlantSymbols.dwg. you can easily add your own blocks by copy pasting the blocks into your project drawing and assigning the block to the plant
Predefined/Approved Plant Lists
Some municipalities have approved plant lists. it's easy to import these lists into a new project by copy pasting either a set of plants or a plant schedule from an existing project. Find some example lists included in the drawing at this link.